 姐夫
姐夫参考
https://github.com/zephir-lang/zephir
https://docs.zephir-lang.com/latest/introduction/
https://github.com/obfuscator-llvm/obfuscator
https://github.com/obfuscator-llvm/obfuscator/tree/llvm-4.0
https://github.com/nickdiego/docker-ollvm
https://github.com/DreamSoule/ollvm17/
https://github.com/llvm/llvm-project/releases/tag/llvmorg-17.0.6
组件简介(官方文档翻译)
Zephir
Zephir - 是一种高级编程语言,可简化 PHP 扩展的创建和可维护性。 Zephir 扩展导出为 C 代码,可以由 gcc/clang/vc++ 等主要 C 编译器进行编译和优化。功能向 PHP 语言公开。
Obfuscator-LLVM
该项目的目标是提供 LLVM 编译套件的开源分支,能够通过代码混淆和防篡改提高软件安全性。由于我们目前主要在中间层 (IR) 级别工作,因此我们的工具与 LLVM 当前支持的所有编程语言(C、C++、Objective-C、Ada 和 Fortran)和目标平台(x86、x86-64、PowerPC、PowerPC-64、ARM、Thumb、SPARC、Alpha、CellSPU、MIPS、MSP430、SystemZ 和 XCore)兼容。
docker-ollvm
此存储库提供了一个 Dockerfile 和一些辅助 shell 脚本,可用于轻松地从源代码构建 Obfuscator-LLVM 项目,并将其配置为 Android NDK 工具链。这些脚本既可以用作独立工具,也可以在 Docker 映像中使用。
环境
系统
Ubuntu 24.04.3 LTS (GNU/Linux 6.8.0-64-generic x86_64)
git
版本控制工具,用于从代码仓库(如 GitHub、GitLab)拉取、提交、同步代码。
gcc
GNU C 编译器(GNU Compiler Collection),用于编译 C/C++ 程序。
make
自动化构建工具,配合 Makefile 使用,可自动执行编译、安装等任务。
re2c
用于将正则表达式转换成高效的 C 语言代码的工具。PHP 编译或开发扩展时经常需要它来生成词法分析器。
php
PHP 解释器本体,提供 PHP 脚本运行环境。
php-json
PHP 的 JSON 支持模块,使 PHP 能够处理 JSON 数据(编码与解码)。
php-dev
PHP 开发包,包含头文件和开发工具,用于编译 PHP 扩展(如 .so 动态库)。
libpcre3-dev
PCRE(Perl Compatible Regular Expressions)开发库,提供正则表达式匹配功能。PHP 内部依赖它处理正则表达式。
build-essential
Ubuntu 的基本编译工具包合集,包含 gcc、g++、make 等,编译源码时常用。
安装
开发套件
sudo apt install git gcc make re2c libpcre3-dev build-essential
PHP与其开发套件
Zephir官方文档推荐直接使用如下命令
sudo apt install php php-json php-dev
来安装 php 和其套件,但是因为系统版本不同会导致安装的 php 相关版本也不同所以安装指定版本
安装指定版本
# 1️⃣ 更新系统
sudo apt update && sudo apt upgrade -y

# 2️⃣ 安装软件属性工具
sudo apt install -y software-properties-common

# 3️⃣ 添加 PHP 官方维护者 PPA 源
sudo add-apt-repository ppa:ondrej/php -y

# 4️⃣ 更新源
sudo apt update

# 5️⃣ 安装
sudo apt install -y php8.1 php8.1-dev

# 从 PHP 8.0 起,json 不再单独存在

# 检查 json 是否存在
root@server1:~# php -m | grep json
json

# 检查 php 和其开发库是否成功安装
root@server1:~# php -v
PHP 8.1.33 (cli) (built: Jul  3 2025 16:16:18) (NTS)
Copyright (c) The PHP Group
Zend Engine v4.1.33, Copyright (c) Zend Technologies
    with Zend OPcache v8.1.33, Copyright (c), by Zend Technologies
root@server1:~# phpize -v
Configuring for:
PHP Api Version:         20210902
Zend Module Api No:      20210902
Zend Extension Api No:   420210902
Zephir
先决条件
- Zephir parser >= 1.3.0
- C 编译器(如 gcc >= 4.4)或替代编译器(如 clang >= 3.0、Visual C++ >= 11 或 Intel C++)。建议使用
gcc4.4 或更高版本 - re2c 0.13.6 或更高版本
- PHP 开发标头和工具
- 对于基于 Linux 的系统,您还需要: * GNU make 3.81 或更高版本 * autoconf 2.31 或更高版本 * automake 1.14 或更高版本 * libpcre3 * 在 Ubuntu 上使用
gcc时的构建必需包(可能在其他发行版中也是如此)
Zephir parser
PECL安装
pecl install zephir_parser
编译安装
sudo apt install autoconf automake
git clone https://github.com/zephir-lang/php-zephir-parser.git
cd php-zephir-parser
phpize
./configure
make
sudo make install

将扩展添加到 `php.ini`

# 查看 php.ini 路径
root@server1:~/php-zephir-parser# php --ini
Configuration File (php.ini) Path: /etc/php/8.1/cli
Loaded Configuration File:         /etc/php/8.1/cli/php.ini
Scan for additional .ini files in: /etc/php/8.1/cli/conf.d
Additional .ini files parsed:      /etc/php/8.1/cli/conf.d/10-opcache.ini,
/etc/php/8.1/cli/conf.d/10-pdo.ini,
/etc/php/8.1/cli/conf.d/20-calendar.ini,
/etc/php/8.1/cli/conf.d/20-ctype.ini,
/etc/php/8.1/cli/conf.d/20-exif.ini,
/etc/php/8.1/cli/conf.d/20-ffi.ini,
/etc/php/8.1/cli/conf.d/20-fileinfo.ini,
/etc/php/8.1/cli/conf.d/20-ftp.ini,
/etc/php/8.1/cli/conf.d/20-gettext.ini,
/etc/php/8.1/cli/conf.d/20-iconv.ini,
/etc/php/8.1/cli/conf.d/20-phar.ini,
/etc/php/8.1/cli/conf.d/20-posix.ini,
/etc/php/8.1/cli/conf.d/20-readline.ini,
/etc/php/8.1/cli/conf.d/20-shmop.ini,
/etc/php/8.1/cli/conf.d/20-sockets.ini,
/etc/php/8.1/cli/conf.d/20-sysvmsg.ini,
/etc/php/8.1/cli/conf.d/20-sysvsem.ini,
/etc/php/8.1/cli/conf.d/20-sysvshm.ini,
/etc/php/8.1/cli/conf.d/20-tokenizer.ini

# 追加扩展到配置文件
root@server1:~/php-zephir-parser# echo -e "\n[Zephir Parser]\nextension=zephir_parser.so" | sudo tee -a /etc/php/8.1/cli/php.ini

[Zephir Parser]
extension=zephir_parser.so

# 查看是否加载成功
root@server1:~/php-zephir-parser# php -m | grep zephir
zephir_parser
测试
使用如下内容新建 zephir_parser_test.php
<?php
$program = <<<EOF
namespace Acme;

class Greeting
{
    public static function sayHello() -> void
    {
        echo "Hello, World!";
    }
}
EOF;

$retval = zephir_parse_file($program, '(eval code)');

var_dump($retval);
# 使用 vim 编辑文件
root@server1:~# vim zephir_parser_test.php

# 测试
root@server1:~# php zephir_parser_test.php
array(2) {
  [0]=>
  array(5) {
    ["type"]=>
    string(9) "namespace"
    ["name"]=>
    string(4) "Acme"
    ["file"]=>
    string(11) "(eval code)"
    ["line"]=>
    int(3)
    ["char"]=>
    int(5)
  }
  [1]=>
  array(8) {
    ["type"]=>
    string(5) "class"
    ["name"]=>
    string(8) "Greeting"
    ["abstract"]=>
    int(0)
    ["final"]=>
    int(0)
    ["definition"]=>
    array(4) {
      ["methods"]=>
      array(1) {
        [0]=>
        array(9) {
          ["visibility"]=>
          array(2) {
            [0]=>
            string(6) "public"
            [1]=>
            string(6) "static"
          }
          ["type"]=>
          string(6) "method"
          ["name"]=>
          string(8) "sayHello"
          ["statements"]=>
          array(1) {
            [0]=>
            array(5) {
              ["type"]=>
              string(4) "echo"
              ["expressions"]=>
              array(1) {
                [0]=>
                array(5) {
                  ["type"]=>
                  string(6) "string"
                  ["value"]=>
                  string(13) "Hello, World!"
                  ["file"]=>
                  string(11) "(eval code)"
                  ["line"]=>
                  int(7)
                  ["char"]=>
                  int(27)
                }
              }
              ["file"]=>
              string(11) "(eval code)"
              ["line"]=>
              int(8)
              ["char"]=>
              int(5)
            }
          }
          ["return-type"]=>
          array(5) {
            ["type"]=>
            string(11) "return-type"
            ["void"]=>
            int(1)
            ["file"]=>
            string(11) "(eval code)"
            ["line"]=>
            int(6)
            ["char"]=>
            int(5)
          }
          ["file"]=>
          string(11) "(eval code)"
          ["line"]=>
          int(5)
          ["last-line"]=>
          int(9)
          ["char"]=>
          int(26)
        }
      }
      ["file"]=>
      string(11) "(eval code)"
      ["line"]=>
      int(3)
      ["char"]=>
      int(5)
    }
    ["file"]=>
    string(11) "(eval code)"
    ["line"]=>
    int(3)
    ["char"]=>
    int(5)
  }
}

# 如上显示即成功
Zephir自身安装
官方推荐的安装方法是使用 composer
composer安装
# 安装 composer
sudo apt install composer

# 查看版本
root@server1:~/zephir# composer -V
Do not run Composer as root/super user! See https://getcomposer.org/root for details
Continue as root/super user [yes]?
Composer version 2.7.1 2024-02-09 15:26:28

# 安装 zephir 需要的 PHP 扩展
sudo apt install -y php8.1-xml php8.1-mbstring php8.1-intl

# 安装 zephir
root@server1:~/zephir# composer require phalcon/zephir
Do not run Composer as root/super user! See https://getcomposer.org/root for details
Continue as root/super user [yes]?
./composer.json has been updated
Running composer update phalcon/zephir
Loading composer repositories with package information
Updating dependencies
Nothing to modify in lock file
Installing dependencies from lock file (including require-dev)
Package operations: 4 installs, 0 updates, 0 removals
  - Installing phalcon/cli-options-parser (v2.0.0): Extracting archive
  - Installing psr/log (3.0.2): Extracting archive
  - Installing monolog/monolog (2.10.0): Extracting archive
  - Installing phalcon/zephir (0.19.0): Extracting archive
Generating autoload files
3 packages you are using are looking for funding.
Use the `composer fund` command to find out more!
No security vulnerability advisories found.
Using version ^0.19.0 for phalcon/zephir

# 添加到环境变量
root@server1:~/zephir# echo 'export PATH="$PATH:/root/zephir/vendor/bin"' >> ~/.bashrc
root@server1:~/zephir# source ~/.bashrc

# 测试
root@server1:~/zephir# zephir help
 _____              __    _
/__  /  ___  ____  / /_  (_)____
  / /  / _ \/ __ \/ __ \/ / ___/
 / /__/  __/ /_/ / / / / / /
/____/\___/ .___/_/ /_/_/_/
         /_/

Zephir 0.19.0 by the Phalcon Team
Usage:
  command [options] [arguments]

Options:
      --dumpversion  Print the version of the compiler and don't do anything else (also works with a single hyphen)
  -h, --help         Print this help message
      --no-ansi      Disable ANSI output
  -v, --verbose      Displays more detail in error messages from exceptions generated by commands (can also disable with -V)
      --vernum       Print the version of the compiler as integer
      --version      Print compiler version information and quit

Available commands:
  api        Generates a HTML API based on the classes exposed in the extension
  build      Generates/Compiles/Installs a Zephir extension
  clean      Cleans any object files created by the extension
  compile    Compile a Zephir extension
  fullclean  Cleans any object files created by the extension (including files generated by phpize)
  generate   Generates C code from the Zephir code without compiling it
  help       Display help for a command
  init       Initializes a Zephir extension
  install    Installs the extension in the extension directory (may require root password)
  stubs      Generates stubs that can be used in a PHP IDE
关于 zephir 开发官网给了很好的例子,因为这篇文章算是事后记录,项目已经开发完成。
主要目的是记录构建和编译最终扩展。
https://docs.zephir-lang.com/latest/tutorial/#adding-our-first-class
一笔带过
项目开发
# 初始化项目
root@server1:~# mkdir projects
root@server1:~# cd projects/
root@server1:~/projects# zephir init pluginsystem
# 项目默认结构
root@server1:~/projects# tree pluginsystem/
pluginsystem/
├── config.json
├── ext
│   └── kernel
│       ├── array.c
│       ├── array.h
│       ├── backtrace.c
│       ├── backtrace.h
│       ├── debug.c
│       ├── debug.h
│       ├── exception.c
│       ├── exception.h
│       ├── exit.c
│       ├── exit.h
│       ├── fcall.c
│       ├── fcall.h
│       ├── file.c
│       ├── file.h
│       ├── filter.c
│       ├── filter.h
│       ├── globals.h
│       ├── iterator.c
│       ├── iterator.h
│       ├── main.c
│       ├── main.h
│       ├── math.c
│       ├── math.h
│       ├── memory.c
│       ├── memory.h
│       ├── object.c
│       ├── object.h
│       ├── operators.c
│       ├── operators.h
│       ├── README.md
│       ├── require.c
│       ├── require.h
│       ├── string.c
│       ├── string.h
│       ├── time.c
│       ├── time.h
│       ├── variables.c
│       └── variables.h
└── pluginsystem

4 directories, 39 files

# config.json 是配置文件

# 主要在 pluginsystem/pluginsystem 下创建.zep后缀文件实现功能

# 可以用 %{}% 直接在Zephir语言里嵌入c代码,例如导入头文件,定义变量。
// %{}%包裹的c代码
%{
    if (!check())
    {
}%
		// Zephir语言代码
    throw new \Exception(this->message("Error"));
// %{}%包裹的c代码
%{
    }
}%
# 当然以上只是一个例子,强大程度不限于此
# 写的时候甚至觉得魔幻,怎么会那么灵活且自由。看了下zephir编译出来的代码。Zephir把Zephir语言转c代码,写的c代码则原封不动塞到指定位置。

# 编译
root@server1:~/projects/pluginsystem# zephir build
..................................................
 Preparing configuration file...
 Compiling...
 Zephir version has changed, use "zephir fullclean" to perform a full clean of the project
 Installing...
Extension installed.
Add "extension=pluginsystem.so" to your php.ini
Don't forget to restart your web server

# 出现类似上述提示即编译成功,如果失败则查看编译日志寻找错误并解决。

# 追加扩展到配置文件
root@server1:~/projects/pluginsystem# echo -e "\n[pluginsystem]\nextension=pluginsystem.so" | sudo tee -a /etc/php/8.1/cli/php.ini

[pluginsystem]
extension=pluginsystem.so

# 查看是否加载成功
root@server1:~/projects/pluginsystem# php -m | grep pluginsystem
pluginsystem

# 清理
root@server1:~/projects/pluginsystem# zephir fullclean
当然这只是使用zephir快速编译,可是仅仅这样编译出来的扩展不好上线使用。比如加入了授权等,很容易被破解。
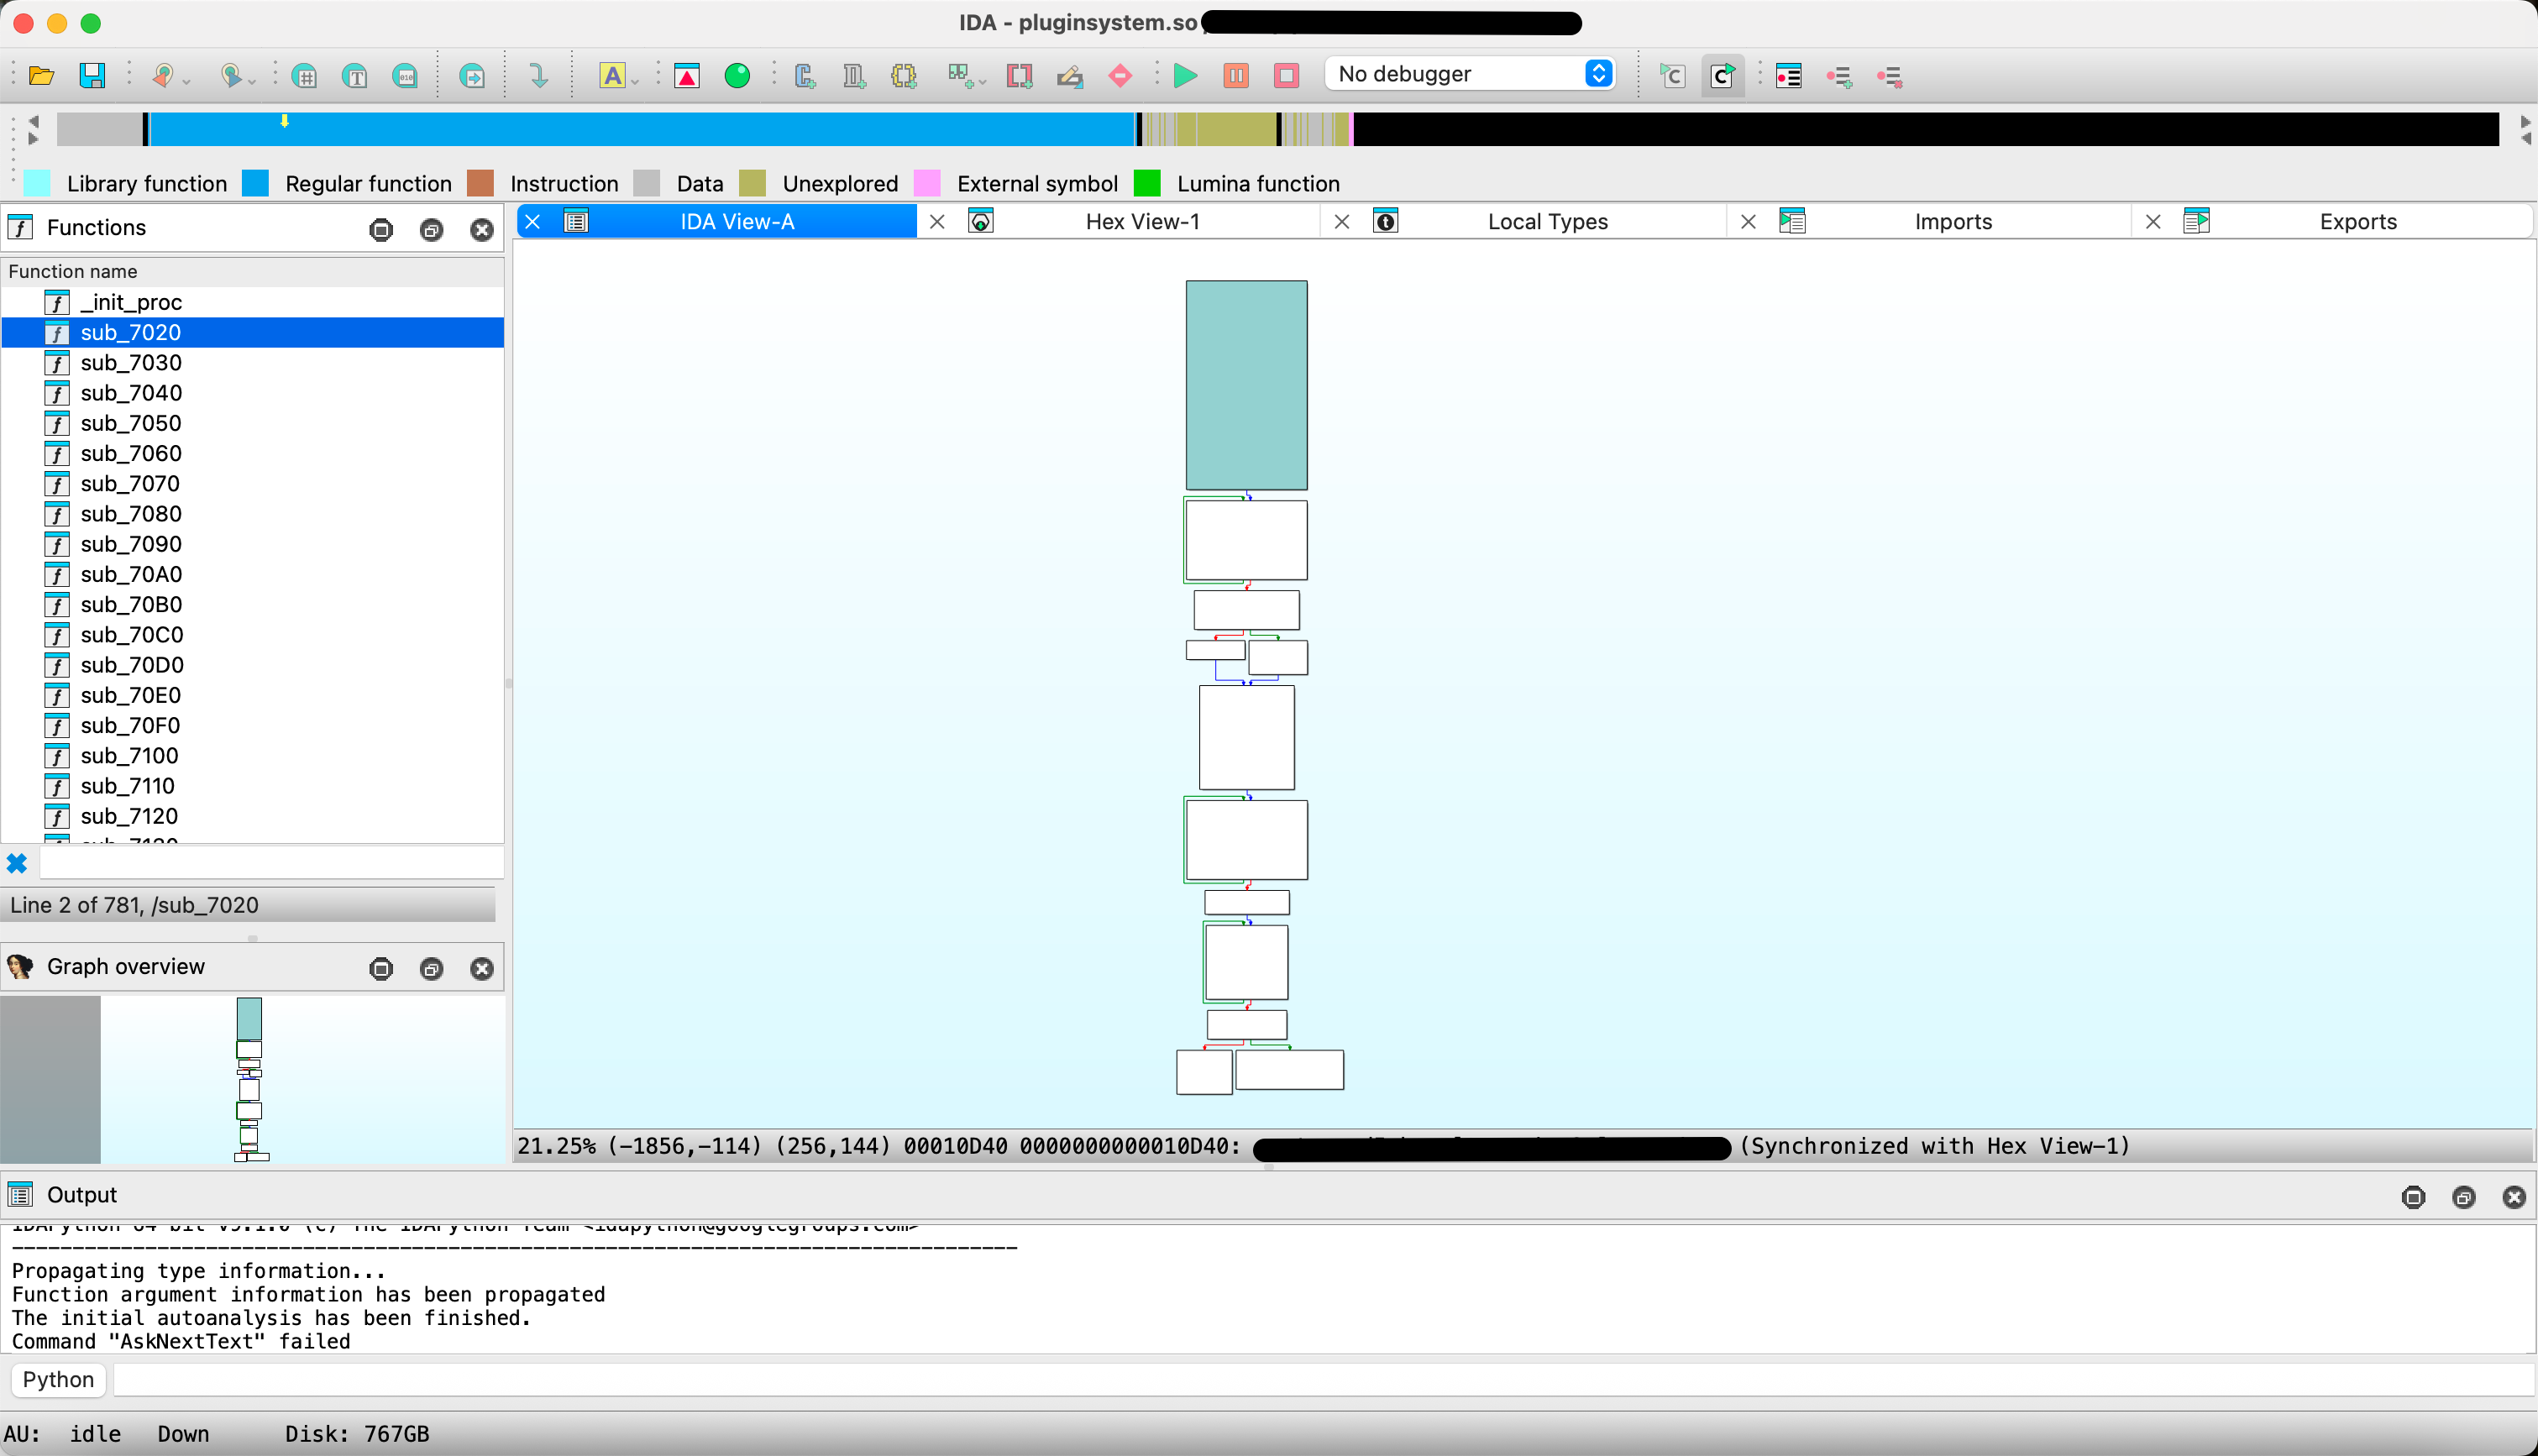
下面用IDA随便查看一个子程序的流程图举例。直上直下,简简单单。
Ollvm编译
OLLVM 在编译时常会因为系统版本、编译器或构建工具的不兼容而失败,问题看起来有点玄学。但好在有人已经帮我们一键化解决了这类麻烦:使用 nickdiego/docker-ollvm 容器可以直接编译 obfuscator-llvm 的 llvm-4.0 分支,几乎能一次性通过。但是我最初用 ollvm-4.0 编译 PHP 扩展时,也因版本过旧不得不修改 PHP 开发库的源码才能编译成功——虽然最后跑起来了,但这种将就的做法显然不够优雅。
DreamSoule/ollvm17 是 OLLVM 的移植版,基于 LLVM 17 进行适配与更新,相比早期的 OLLVM 4.0 版本支持了更多新特性与现代编译器架构。
Ollvm17(fla存在bug)
# 下载 llvm 17 源码
root@server1:~# wget https://github.com/llvm/llvm-project/releases/download/llvmorg-17.0.6/llvm-project-17.0.6.src.tar.xz

# 创建目录
root@server1:~# mkdir llvm-17.0.6

# 解压
root@server1:~# sudo tar -xJf llvm-project-17.0.6.src.tar.xz -C llvm-17.0.6 --strip-components=1

# 检查
root@server1:~# cd llvm-17.0.6/
root@server1:~/llvm-17.0.6# ls -al
total 164
drwxr-xr-x 27 root root  4096 Oct 14 05:42 .
drwx------ 14 root root  4096 Oct 14 05:42 ..
-rw-rw-r--  1 root root   219 Nov 28  2023 .arcconfig
-rw-rw-r--  1 root root   437 Nov 28  2023 .arclint
drwxrwxr-x 11 root root  4096 Nov 28  2023 bolt
drwxrwxr-x  2 root root  4096 Nov 28  2023 .ci
drwxrwxr-x 14 root root  4096 Nov 28  2023 clang
-rw-rw-r--  1 root root    19 Nov 28  2023 .clang-format
-rw-rw-r--  1 root root  1406 Nov 28  2023 .clang-tidy
drwxrwxr-x 19 root root  4096 Nov 28  2023 clang-tools-extra
drwxrwxr-x  3 root root  4096 Nov 28  2023 cmake
drwxrwxr-x 11 root root  4096 Nov 28  2023 compiler-rt
-rw-rw-r--  1 root root   770 Nov 28  2023 CONTRIBUTING.md
drwxrwxr-x  5 root root  4096 Nov 28  2023 cross-project-tests
drwxrwxr-x 12 root root  4096 Nov 28  2023 flang
-rw-rw-r--  1 root root  2345 Nov 28  2023 .git-blame-ignore-revs
drwxrwxr-x  3 root root  4096 Nov 28  2023 .github
-rw-rw-r--  1 root root  2222 Nov 28  2023 .gitignore
drwxrwxr-x 16 root root  4096 Nov 28  2023 libc
drwxrwxr-x 16 root root  4096 Nov 28  2023 libclc
drwxrwxr-x 11 root root  4096 Nov 28  2023 libcxx
drwxrwxr-x  9 root root  4096 Nov 28  2023 libcxxabi
drwxrwxr-x  7 root root  4096 Nov 28  2023 libunwind
-rw-rw-r--  1 root root 15141 Nov 28  2023 LICENSE.TXT
drwxrwxr-x 15 root root  4096 Nov 28  2023 lld
drwxrwxr-x 16 root root  4096 Nov 28  2023 lldb
drwxrwxr-x 16 root root  4096 Nov 28  2023 llvm
drwxrwxr-x  4 root root  4096 Nov 28  2023 llvm-libgcc
-rw-rw-r--  1 root root  1840 Nov 28  2023 .mailmap
drwxrwxr-x 13 root root  4096 Nov 28  2023 mlir
drwxrwxr-x  8 root root  4096 Nov 28  2023 openmp
drwxrwxr-x 10 root root  4096 Nov 28  2023 polly
drwxrwxr-x  6 root root  4096 Nov 28  2023 pstl
-rw-rw-r--  1 root root  1594 Nov 28  2023 README.md
drwxrwxr-x  3 root root  4096 Nov 28  2023 runtimes
-rw-rw-r--  1 root root   205 Nov 28  2023 SECURITY.md
drwxrwxr-x  4 root root  4096 Nov 28  2023 third-party
drwxrwxr-x  4 root root  4096 Nov 28  2023 utils

# 下载 ollvm 17
root@server1:~# git clone https://github.com/DreamSoule/ollvm17.git

# 替换文件
root@server1:~# cp -a ~/ollvm17/llvm-project/llvm/lib/Passes/* ~/llvm-17.0.6/llvm/lib/Passes/

# 编译前工具准备
root@server1:~# sudo apt install -y cmake ninja-build

# 编译
# 看似简单的几条命令也可能是最要命的过程
root@server1:~# cd llvm-17.0.6/
root@server1:~/llvm-17.0.6# mkdir build && cd build
root@server1:~/llvm-17.0.6/build# cmake -G Ninja -DCMAKE_BUILD_TYPE=Release -DLLVM_ENABLE_EH=OFF -DLLVM_ENABLE_RTTI=OFF -DLLVM_ENABLE_ASSERTIONS=ON -DLLVM_ENABLE_PROJECTS="clang;lld" ../llvm
root@server1:~/llvm-17.0.6/build# ninja -j$(nproc)
# ...根据系统配置不同等待编译(千万别报错啊喂)...

# 如果出现 error: ‘llvm::Function::BasicBlockListType& llvm::Function::getBasicBlockList()’ is private within this context

# 使用 vim 编辑
root@server1:~/llvm-17.0.6/build# vim ~/llvm-17.0.6/llvm/lib/Passes/Obfuscation/IPObfuscationContext.cpp
# :set nu 显示行号
# :232 跳转到232行
232         //NF->getBasicBlockList().splice(NF->begin(), F->getBasicBlockList());
233         NF->splice(NF->begin(), F);

# 或者

# 使用 vim 编辑
root@server1:~/llvm-17.0.6/build# vim ../llvm/include/llvm/IR/Function.h
# :set nu 显示行号
# :722 跳转到722行
722         //private:
723         public:

# 如果出现 error: ‘valueEscapes’ was not declared in this scope
# 使用 vim 编辑
root@server1:~/llvm-17.0.6/build# vim ~/llvm-17.0.6/llvm/lib/Passes/Obfuscation/Utils.cpp
# :set nu 显示行号
# :193 跳转到193行
193     //if (!(isa<AllocaInst>(I) && I.getParent() == BBEntry) && valueEscapes(I))
194     if (!(isa<AllocaInst>(I) && I.getParent() == BBEntry) && PointerMayBeCaptured(&I, false, false))
# 并在文件开头加入
	#include "llvm/Analysis/CaptureTracking.h"

# 或者

static bool valueEscapes(const Instruction &Inst) {
  if (!Inst.getType()->isSized())
    return false;

  const BasicBlock *BB = Inst.getParent();
  for (const User *U : Inst.users()) {
    const Instruction *UI = cast<Instruction>(U);
    if (UI->getParent() != BB || isa<PHINode>(UI))
      return true;
  }
  return false;
}

# 复制上述函数到
# /root/llvm-17.0.6/llvm/lib/Passes/Obfuscation/Utils.cpp

# 构建完成后验证混淆参数是否可用
root@server1:~# ~/llvm-17.0.6/build/bin/opt --help | grep -E "fla|bcf|sub|split|sobf|icall|ibr|igv"
      --amdgpu-simplifylib                                                 - Simplify well-known AMD library calls
      --flattencfg                                                         - Flatten the CFG
      --hexagon-split-double                                               - Hexagon Split Double Registers
      --partially-inline-libcalls                                          - Partially inline calls to library functions
      --replace-with-veclib                                                - Replace intrinsics with calls to vector library
      --targetlibinfo                                                      - Target Library Information
      --x86-flags-copy-lowering                                            - X86 EFLAGS copy lowering
  --bcf                                                                 - BogusControlFlow: application number -bcf_loop=x must be x > 0
  --bcf_loop=<number of times>                                          - Choose how many time the -bcf pass loop on a function
  --bcf_prob=<probability rate>                                         - Choose the probability [%] each basic blocks will be obfuscated by the -bcf pass
  --disable-builtin=<string>                                            - Disable specific target library builtin function
  --enable-split-backedge-in-load-pre                                   -
  --fla                                                                 - Flattening
  --fncmd                                                               - use function name control obfuscation(_ + command + _ | example: function_fla_bcf_)
  --hash-based-counter-split                                            - Rename counter variable of a comdat function based on cfg hash
  --hot-cold-split                                                      - Enable hot-cold splitting pass
  --ibr                                                                 - Indirect Branch
  --icall                                                               - Indirect Call
  --igv                                                                 - Indirect Global Variable
  --load-pass-plugin=<string>                                           - Load passes from plugin library
  --sobf                                                                - String Obfuscation
  --split                                                               - SplitBasicBlock: split_num=3(init)
  --split-machine-functions                                             - Split out cold basic blocks from machine functions based on profile information
  --split_num=<int>                                                     - Split <split_num> time(s) each BB
  --sub                                                                 - Substitution: sub_loop
  --sub_loop=<number of times>                                          - Choose how many time the -sub pass loops on a function
  --thinlto-split-lto-unit                                              - Enable splitting of a ThinLTO LTOUnit
创建测试文件
// obf_complex.c
#include <stdio.h>
#include <string.h>

int encode_char(char c, int key) {
    return (c ^ key) + (key % 7);
}

int verify_token(const char *token) {
    const char *secret = "Hello";
    int result = 0;

    for (int i = 0; i < strlen(secret); i++) {
        int t = encode_char(token[i], i + 5);
        int s = encode_char(secret[i], i + 5);

        if (t == s) {
            result += (i * 3) ^ 7;
        } else if (t > s) {
            result -= (i + 2);
        } else {
            result ^= (t + s);
        }
    }

    if (result == 77) {
        if ((token[0] ^ token[2]) == 0x12) {
            return 1;
        } else {
            return 2;
        }
    } else if (result > 0) {
        return 3;
    } else {
        return 0;
    }
}

void log_attempt(const char *user, int code) {
    if (code == 1)
        printf("[+] %s authenticated successfully!\n", user);
    else if (code == 2)
        printf("[!] %s partially matched, suspicious input.\n", user);
    else if (code == 3)
        printf("[*] %s had positive entropy but failed check.\n", user);
    else
        printf("[-] %s failed authentication.\n", user);
}

int main() {
    char username[32];
    char token[32];

    printf("Enter username: ");
    scanf("%31s", username);
    printf("Enter token: ");
    scanf("%31s", token);

    int code = verify_token(token);
    log_attempt(username, code);

    return 0;
}
普通编译
root@server1:~# ~/llvm-17.0.6/build/bin/clang -O2 obf_complex.c -o normal_complex.out
混淆编译
root@server1:~# ~/llvm-17.0.6/build/bin/clang -O2 -mllvm -bcf -mllvm -fla -mllvm -sub obf_complex.c -o obf_complex.out

# 1️⃣ 控制流扁平化(Flattening)
~/llvm-17.0.6/build/bin/clang -mllvm -fla obf_complex.c -o obf_fla.out

# 2️⃣ 虚假控制流(Bogus Control Flow)
~/llvm-17.0.6/build/bin/clang -O2 -mllvm -bcf obf_complex.c -o obf_bcf.out

# 3️⃣ 虚假控制流 + 参数调优(概率80%,循环3)
~/llvm-17.0.6/build/bin/clang -O2 -mllvm -bcf -mllvm -bcf_prob=80 -mllvm -bcf_loop=3 obf_complex.c -o obf_bcf_tuned.out

# 4️⃣ 指令替换(Substitution)
~/llvm-17.0.6/build/bin/clang -O2 -mllvm -sub obf_complex.c -o obf_sub.out

# 5️⃣ 指令替换 + 强度提升
~/llvm-17.0.6/build/bin/clang -O2 -mllvm -sub -mllvm -sub_loop=3 obf_complex.c -o obf_sub_tuned.out

# 6️⃣ 字符串加密(String Obfuscation)
~/llvm-17.0.6/build/bin/clang -O2 -mllvm -sobf obf_complex.c -o obf_sobf.out

# 7️⃣ 间接调用混淆(Indirect Call)
~/llvm-17.0.6/build/bin/clang -O2 -mllvm -icall obf_complex.c -o obf_icall.out

# 8️⃣ 间接跳转混淆(Indirect Branch)
~/llvm-17.0.6/build/bin/clang -O2 -mllvm -ibr obf_complex.c -o obf_ibr.out

# 9️⃣ 全局变量间接化(Indirect Global Variable)
~/llvm-17.0.6/build/bin/clang -O2 -mllvm -igv obf_complex.c -o obf_igv.out

# 🔟 基本块拆分(Split)
~/llvm-17.0.6/build/bin/clang -O2 -mllvm -split obf_complex.c -o obf_split.out

# 11️⃣ 基本块拆分(5份)
~/llvm-17.0.6/build/bin/clang -O2 -mllvm -split -mllvm -split_num=5 obf_complex.c -o obf_split5.out
Ollvm19
# 下载 llvm 19.1.5 源码
root@server1:~# wget https://github.com/llvm/llvm-project/releases/download/llvmorg-19.1.5/llvm-project-19.1.5.src.tar.xz

# 创建目录
root@server1:~# mkdir llvm-19.1.5

# 解压
root@server1:~# sudo tar -xJf llvm-project-19.1.5.src.tar.xz -C llvm-19.1.5 --strip-components=1

# 检查
root@server1:~# cd llvm-19.1.5/
root@server1:~/llvm-19.1.5# ls -al

# 下载 ollvm 移植版 (来自:https://github.com/DreamSoule/ollvm17/issues/38)
root@server1:~# cd ~
root@server1:~# wget https://github.com/user-attachments/files/18906741/Passes.zip

# 解压
root@server1:~# unzip Passes.zip -d Passes

# 替换文件
root@server1:~# cp -a ~/Passes/* ~/llvm-19.1.5/llvm/lib/Passes/

# 编译前工具准备
root@server1:~# sudo apt install -y cmake ninja-build

# 编译
root@server1:~# cd llvm-19.1.5/
root@server1:~/llvm-19.1.5# mkdir build && cd build
root@server1:~/llvm-19.1.5/build# cmake -G Ninja -DCMAKE_BUILD_TYPE=Release -DLLVM_ENABLE_EH=OFF -DLLVM_ENABLE_RTTI=OFF -DLLVM_ENABLE_ASSERTIONS=ON -DLLVM_ENABLE_PROJECTS="clang;lld" ../llvm
root@server1:~/llvm-19.1.5/build# ninja -j$(nproc)

# 报错 error: ‘class llvm::PointerType’ has no member named ‘isOpaqueOrPointeeTypeMatches’

# 修改 ~/llvm-19.1.5/llvm/lib/Passes/Obfuscation/compat/CallSite.h:137

#if LLVM_VERSION_MAJOR >= 15
    assert(cast<PointerType>(V->getType())
               ->isOpaqueOrPointeeTypeMatches(
                   cast<CallBase>(getInstruction())->getFunctionType()) &&
           "New callee type does not match FunctionType on call");
#else
    assert(cast<PointerType>(V->getType())->getElementType() ==
               cast<CallBase>(getInstruction())->getFunctionType() &&
           "New callee type does not match FunctionType on call");
#endif

# ⬇️⬇️⬇️

#if LLVM_VERSION_MAJOR >= 19
    // LLVM 19: isOpaqueOrPointeeTypeMatches removed; opaque pointers are default
    assert(V->getType()->isPointerTy() &&
           "Callee must have pointer type");
#elif LLVM_VERSION_MAJOR >= 15
    assert(cast<PointerType>(V->getType())
               ->isOpaqueOrPointeeTypeMatches(
                   cast<CallBase>(getInstruction())->getFunctionType()) &&
           "New callee type does not match FunctionType on call");
#else
    assert(cast<PointerType>(V->getType())->getElementType() ==
               cast<CallBase>(getInstruction())->getFunctionType() &&
           "New callee type does not match FunctionType on call");
#endif
普通编译
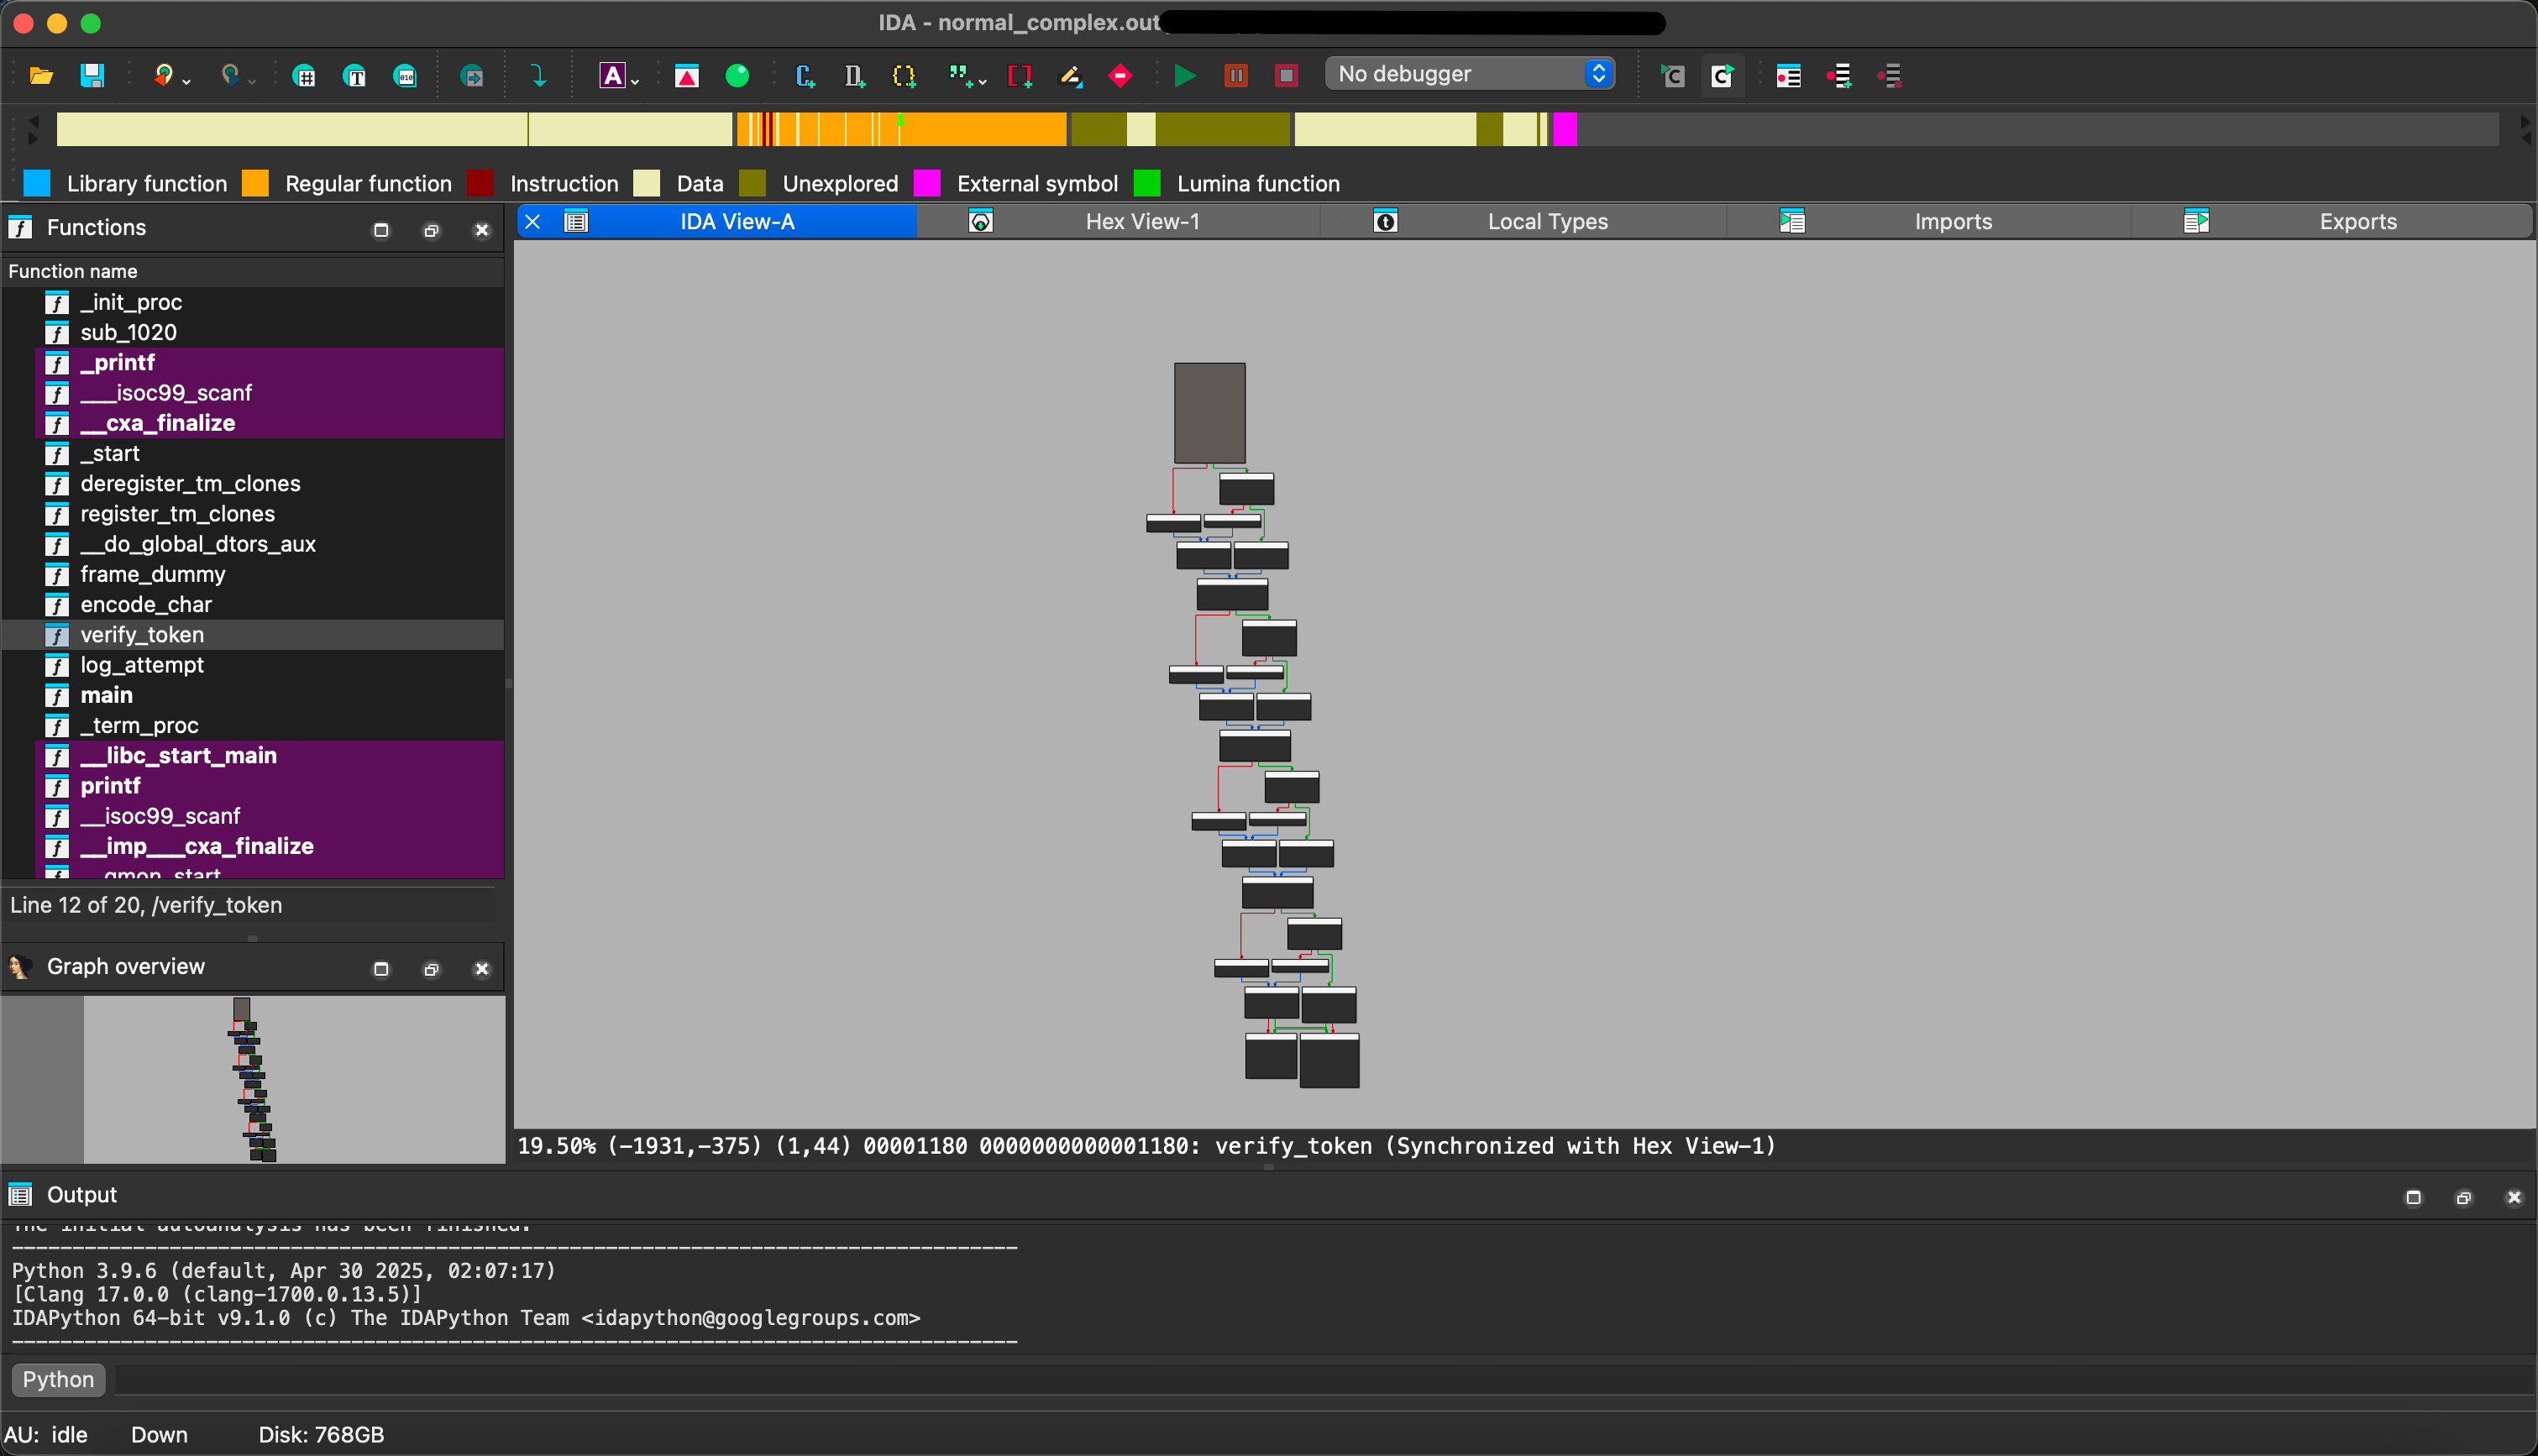
root@server1:~# ~/llvm-19.1.5/build/bin/clang -O2 obf_complex.c -o normal_complex.out
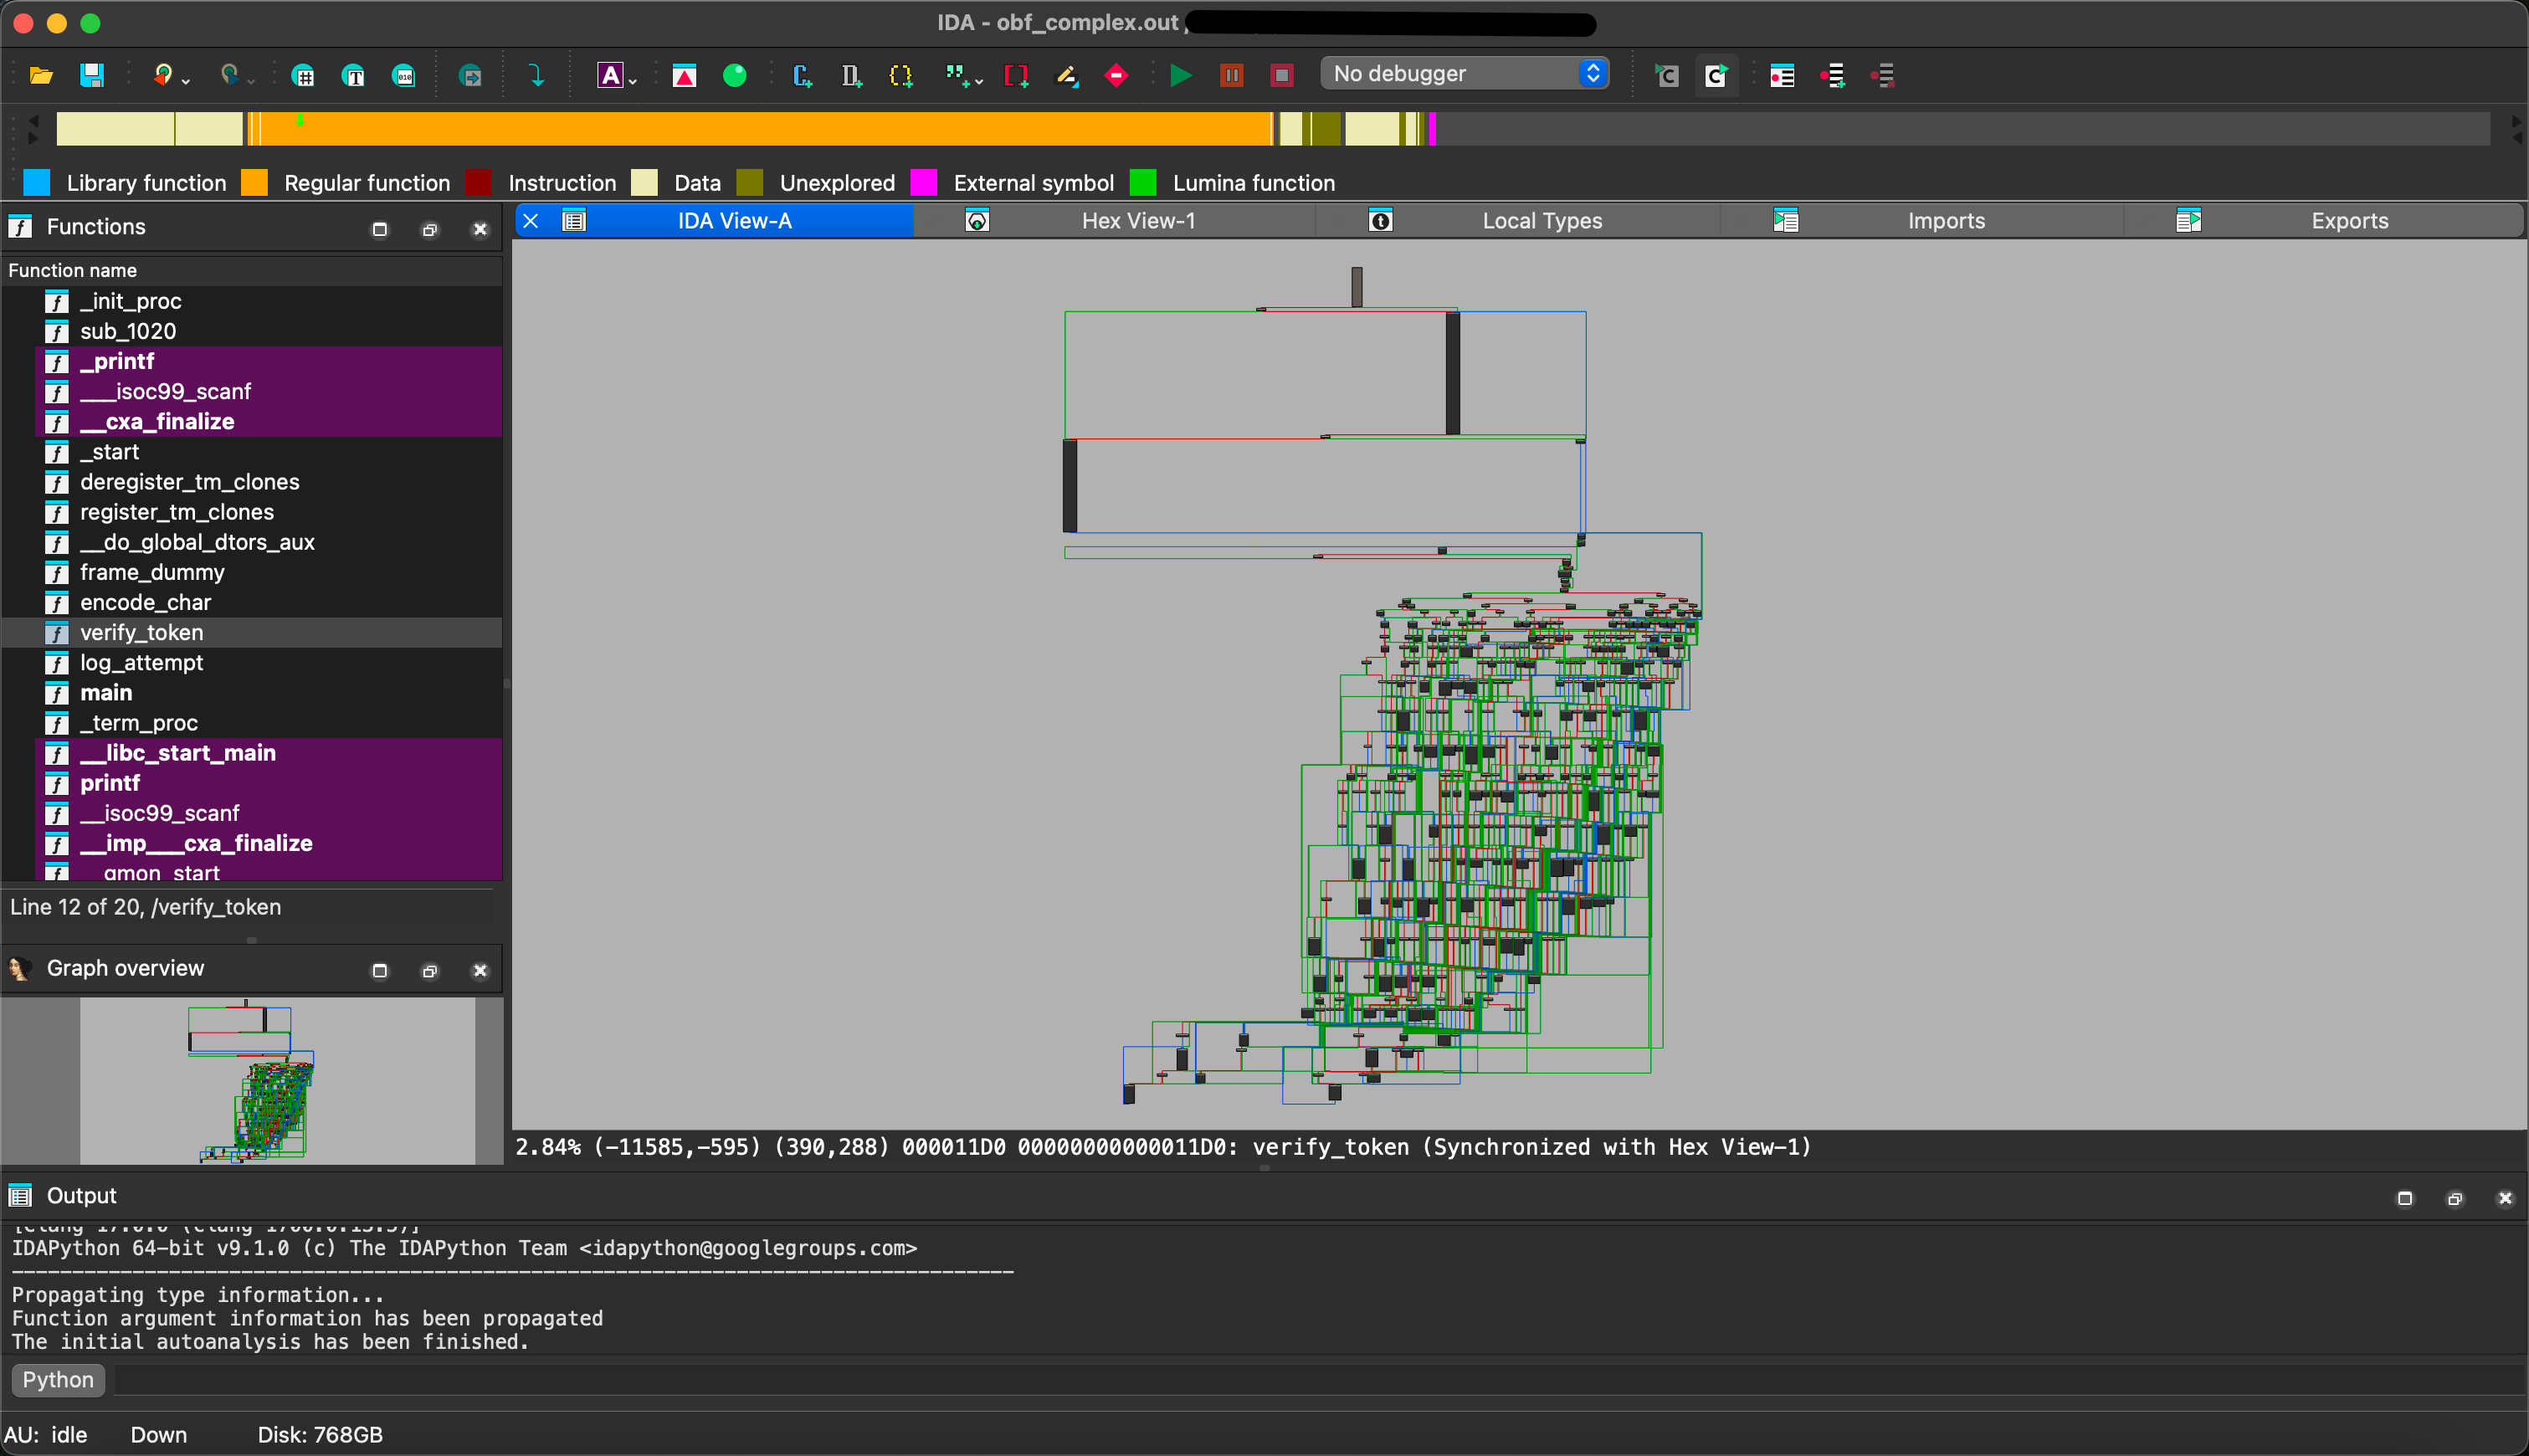
root@server1:~# ~/llvm-19.1.5/build/bin/clang -O2 -mllvm -bcf -mllvm -fla -mllvm -sub obf_complex.c -o obf_complex.out
混淆扩展
主要原理就是通过zephir generate命令生成c代码,再用ollvm去编译。
#!/bin/bash
# ============================================
# 使用 OLLVM 混淆编译 Zephir 扩展
# ============================================

set -e  # 遇到错误自动退出

echo "=== 使用 OLLVM 混淆编译扩展 ==="
echo ""

# ==== 基础路径 ====
PROJECT_DIR="/root/projects/pluginsystem"
EXT_DIR="$PROJECT_DIR/ext"
OLLVM_PATH="/root/llvm-19.1.5/build"
SO_FILE="$EXT_DIR/modules/pluginsystem.so"

# ==== OLLVM 编译器路径 ====
export CC="${OLLVM_PATH}/bin/clang"
export CXX="${OLLVM_PATH}/bin/clang++"

if [ ! -x "$CC" ]; then
  echo "错误:未找到 OLLVM 编译器:$CC"
  exit 1
fi
echo "使用 OLLVM 编译器: $CC"
echo ""

# ==== 开始编译 ====
cd "$PROJECT_DIR"

echo "清理旧构建..."
zephir fullclean

echo "生成 Zephir 源码..."
zephir generate

cd "$EXT_DIR"

echo "运行 phpize..."
phpize

echo "配置混淆与优化参数..."

# 控制流扁平化(Flattening)
OBFUSCATE_FLAGS_FLA="-mllvm -fla"
# 代码分割(Split)
OBFUSCATE_FLAGS_SPLIT="-mllvm -split -mllvm -split_num=5"
# 虚假控制流(Bogus Control Flow)
OBFUSCATE_FLAGS_BCF="-mllvm -bcf -mllvm -bcf_prob=80 -mllvm -bcf_loop=3"
# 指令替换(Substitution)
OBFUSCATE_FLAGS_SUB="-mllvm -sub -mllvm -sub_loop=3"
# 字符串加密(String Obfuscation)
OBFUSCATE_FLAGS_SOBF="-mllvm -sobf"
# 间接调用混淆(Indirect Call)
OBFUSCATE_FLAGS_ICALL="-mllvm -icall"
# 间接跳转混淆(Indirect Branch)
OBFUSCATE_FLAGS_IBR="-mllvm -ibr"
# 全局变量间接化(Indirect Global Variable)
OBFUSCATE_FLAGS_IGV="-mllvm -igv"

# 编译优化标志
export CFLAGS="$OBFUSCATE_FLAGS_FLA $OBFUSCATE_FLAGS_BCF $OBFUSCATE_FLAGS_SUB $OBFUSCATE_FLAGS_SPLIT $OBFUSCATE_FLAGS_SOBF $OBFUSCATE_FLAGS_ICALL $OBFUSCATE_FLAGS_IBR $OBFUSCATE_FLAGS_IGV -O3 -fomit-frame-pointer -fvisibility=hidden -ffunction-sections -fdata-sections -DZEPHIR_RELEASE=1"
export LDFLAGS="-Wl,--gc-sections -Wl,--strip-all"

echo "运行 configure..."
./configure

echo "编译中..."
make clean
make -j$(nproc)

# ==== 编译结果检测 ====
if [ ! -f "$SO_FILE" ]; then
  echo "未生成目标文件,请检查错误"
  exit 1
fi

echo ""
echo "编译成功: $SO_FILE"
ls -lh "$SO_FILE"
file "$SO_FILE"

# ==== 安全优化阶段 ====
echo ""
echo "执行发布优化 (strip + remove-section)..."
strip --strip-all "$SO_FILE" || true
strip --remove-section=.comment "$SO_FILE" || true

# ==== 验证 ====
echo ""
echo "最终文件信息:"
ls -lh "$SO_FILE"
file "$SO_FILE"

echo ""
echo "检查 ELF 段 (确认无调试信息)..."
readelf -S "$SO_FILE" | grep -E "debug|comment" || echo "无调试或comment段"

echo ""
echo "检查导出符号 (确认无自定义符号)..."
nm -D "$SO_FILE" | grep -v " U " | head || echo "无自定义符号导出"

# ==== 安装 ====
make install